Authentication & Authorization in Kubernetes - Nginx Plus Ingress Controller with OIDC policy
"Secure your applications, not your network. Verify identity and enforce access controls in the application itself, where they can travel with the application wherever it goes." - John Kindervag, creator of the Zero Trust security model.
Introduction
In today's digital age, securing your applications and services is more critical than ever. One of the essential aspects of application security is authentication and authorization, which ensure that only authorized users have access to resources. Kubernetes is a popular container orchestration platform that is widely used to deploy and manage cloud-native applications. When deploying Kubernetes clusters, it is crucial to ensure that authentication and authorization are properly configured to protect your applications and services. In this article, we will explore the use of the Nginx Plus Ingress Controller with OpenID Connect (OIDC) policy for authentication and authorization in Kubernetes. We will dive into how to configure Nginx Plus Ingress Controller with OIDC policy to authenticate users.
Why OIDC Policy?
In the previous article, we explored how to configure the oauth2 proxy as an external authentication proxy with the Nginx ingress controller. Although this solution can work well, it requires managing the oauth2 proxy instance running in the cluster, including its security patches, and scalability, and relying on community support if anything goes wrong. In production environments, such solutions are not always ideal.
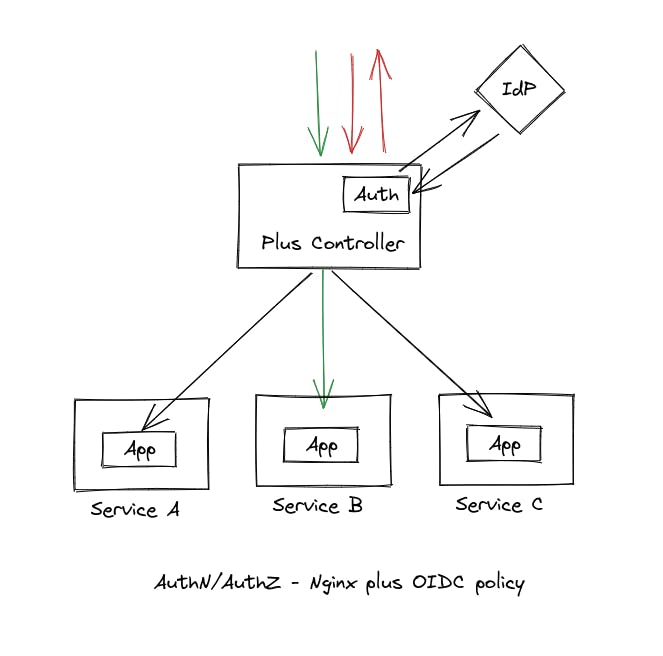
Nginx Plus ingress controller offers various authentication mechanisms out of the box, including OIDC authentication using OIDC policy. In this approach, the Ingress Controller handles authentication logic and session management without relying on an external authentication proxy.
This approach offers two significant advantages. First, we don't have to manage an external authentication proxy like the oauth2 proxy and its security. Second, we can perform authentication and authorization directly at the Nginx ingress controller, saving network traffic generated for each request as requests do not leave the ingress controller. This makes the process more efficient and secure.
How does OIDC Policy work?

When a user tries to access a protected resource, the Nginx Plus Ingress Controller first checks for a session cookie in the request. If a session cookie is present, it verifies the user's session details and returns a successful response, allowing the user to access the resource.
However, if the session cookie is not present, the Nginx Plus Ingress Controller redirects the user to the login page of the configured IdP (such as Google, GitHub, Azure AD, etc.). After the user logs in to the IdP and is redirected back to Ingress Controller's callback URL /_codexch, the Nginx plus ingress controller exchanges the code for user information with the IdP. It then creates a new session for the user using this information and sets a session cookie in the response.
With a valid session cookie, the user can access the requested resource through the Nginx ingress controller without being redirected to the IdP for subsequent requests.
OIDC Policy Configuration
To implement OIDC authentication with the Nginx Plus Ingress Controller, we need to create an OIDC policy. Before we do that, we need to create a Secret to store the client secret required for the OIDC flow.
First, create a new file called client-secret.yaml and paste the following into it:
apiVersion: v1
kind: Secret
metadata:
  name: oidc-secret
type: nginx.org/oidc
data:
  client-secret: <client-secret-in-base64-format>
Make sure to replace <client-secret-in-base64-format> with your client secret in base64 format. You can convert your secret to base64 format using the following command:
echo -n <client-secret> | base64
Once you have your client secret in base64 format, you can deploy the Secret by executing the following command:
kubectl apply -f client-secret.yaml
Next, we will create and deploy the OIDC policy. Create a new file called oidc-policy.yaml and paste the following into it:
apiVersion: k8s.nginx.org/v1
kind: Policy
metadata:
  name: oidc-policy
spec:
  oidc:
    clientID: <client-id>
    clientSecret: oidc-secret
    authEndpoint: <idp-auth-url>
    tokenEndpoint: <idp-token-url>
    jwksURI: <idp-jwt-key-set-url>
    scope: openid+profile+email
Replace the following fields with the corresponding values:
<client-id>: the client ID provided by your IdP<idp-auth-url>: the authorization URL that will be used to check if the user is authenticated or not<idp-token-url>: the token URL used to exchange the code for an access token and ID token<idp-jwt-key-set-url>: the JWT encryption key set URL for decrypting the JWT token
Optionally, you can customize the scope by modifying the scope field. The default scope includes openid, profile, and email. For more information on OIDC scopes, check out the Auth0 documentation on scopes.
For example, if your IdP is Auth0, your OIDC policy would look similar to this:
apiVersion: k8s.nginx.org/v1
kind: Policy
metadata:
  name: oidc-policy
spec:
  oidc:
    clientID: <client-id>
    clientSecret: oidc-secret
    authEndpoint: https://mydomain.us.auth0.com/authorize
    tokenEndpoint: https://mydomain.us.auth0.com/oauth/token
    jwksURI: https://mydomain.us.auth0.com/.well-known/jwks.json
    scope: openid+profile+email
Once you have created the OIDC policy file, you can deploy it using the following command:
kubectl apply -f oidc-policy.yaml
With the OIDC policy deployed, the Nginx Plus Ingress Controller will handle the authentication logic and session management for you, without the need for an external authentication proxy.
Nginx Plus Ingress Controller Configuration
Before we can use the newly deployed OIDC Policy, two prerequisite configurations need to be made in the Nginx Plus Ingress Controller: Zone synchronization and Resolver setup.
Zone synchronization ensures that the OIDC policy works properly across multiple replicas of the Ingress Controller. To enable this, we first need to create a headless service in the Nginx ingress controller namespace. Create a new file called nginx-ingress-headless.yaml and paste the following into it:
apiVersion: v1
kind: Service
metadata:
  name: nginx-ingress-headless
  namespace: nginx-ingress
spec:
  clusterIP: None
  selector:
    app: nginx-ingress
Make sure to specify the correct selector label for your Nginx ingress controller deployment. Deploy this service using the following command:
kubectl apply -f nginx-ingress-headless.yaml
Next, we need to add extra configuration to the Nginx ingress controller using a ConfigMap. Create a new file called nginx-config.yaml and paste the following into it:
kind: ConfigMap
apiVersion: v1
metadata:
  name: nginx-config
  namespace: nginx-ingress
data:
  # Zone Synchronization setup
  stream-snippets: |
    server {
        listen 12345;
        listen [::]:12345;
        zone_sync;
        zone_sync_server nginx-ingress-headless.nginx-ingress.svc.cluster.local:12345 resolve;
    }
  # Resolver setup
  resolver-addresses: <kube-dns-ip>
  resolver-valid: 5s
This configuration sets up zone synchronization and resolver setup for the OIDC policy. Make sure to replace <kube-dns-ip> with the cluster IP of the kube-dns service running inside your cluster. You can find the kube-dns cluster IP by running the following command:
kubectl -n kube-system get service kube-dns
Once you've created this configuration, you can deploy it using the following command:
kubectl apply -f nginx-config.yaml
With the prerequisite configurations in place, the next step is to create a Virtual Server and apply the OIDC policy to it.
Virtual Server Configuration
The virtual server is a custom resource definition provided by Nginx that offers more features compared to the standard Ingress resource. In combination with the OIDC policy, it enables secure access to your application. To create a virtual server, create a new file named virtual-server.yaml and add the following configuration to it:
apiVersion: k8s.nginx.org/v1
kind: VirtualServer
metadata:
  name: app-vs
spec:
  host: <your-domain>
  upstreams:
    - name: demo-app
      service: <app-service-name>
      port: 80
  policies:
    - name: oidc-policy
  routes:
    - path: /
      action:
        proxy:
          upstream: demo-app
Make sure to replace <your-domain> with a valid domain name and <app-service-name> with the name of the service you want to protect using the OIDC policy.
Execute the following command to deploy the virtual server and attach the OIDC policy to it:
kubectl apply -f virtual-server.yaml
Now, when a user tries to access your application, they will be redirected to the IdP configured in the OIDC policy. Only after successful authentication will the user be redirected to the application. Congratulations, you have successfully configured secure access to your application using Nginx plus Ingress Controller and OIDC policy!
What If...?
You want to provide additional user information to the application
By default, the OIDC policy provides the sub claim data via the header username to the application. However, if you need to pass other claim data to the application, you can add a custom location snippet inside the virtual server configuration.
For example, to add a custom header named email and pass the email claim information to the application, you can modify the virtual server configuration as follows:
...
routes:
    - path: /
      location-snippets: proxy_set_header email $jwt_claim_email;
      action:
        proxy:
          upstream: demo-app
...
This will add a new custom header named "email" and pass the email claim data to the application.
You want to provide a custom logout URL
When using the default /logout endpoint, a user will log out of the application. However, in some cases, you may also want the user to log out of the Identity Provider (IdP) or perform additional operations after the logout process. To achieve this, you can create a server snippet and specify a custom logout URL that the user will be redirected to after logging out of the application.
Here's an example server snippet that sets a custom logout redirect URL:
...
host: <your-domain>
  server-snippets: |
    set $logout_redirect "https://myidp.com/logout";
  upstreams:
    - name: demo-app
      service: demo-app-svc
      port: 80
...
Best Practices
Use HTTPS: Always use HTTPS when configuring the OIDC policy as it ensures secure communication between the application and IdP.
Keep IdP secrets safe: Store the IdP secrets securely in a key vault or a secure location accessible only to authorized personnel.
Avoid using custom snippets: Custom snippets can introduce unnecessary complexity and potential security risks to your configuration. Try to use the built-in features and directives provided by Nginx Ingress Controller whenever possible.
Use multiple replicas of the Ingress Controller to ensure high availability - this helps to prevent downtime if one replica fails.
Consider using a commercial version of Nginx Ingress Controller for enterprise-level support, advanced features, and improved scalability.
Conclusion
In conclusion, implementing OpenID Connect (OIDC) authentication with Nginx Plus Ingress Controller can provide a secure and reliable way to protect your applications from unauthorized access. With OIDC, you can take advantage of various identity providers such as Google, Facebook, Okta, etc., and enable Single Sign-On (SSO) for your users. Additionally, Nginx Plus Ingress Controller offers powerful features such as Virtual Servers and OIDC Policies to simplify the configuration process and ensure scalability.
However, it is important to keep in mind the best practices and potential pitfalls when using Nginx Plus Ingress Controller with OIDC. By following the recommended practices, such as avoiding custom snippets, keeping the configuration simple, and using Kubernetes best practices, you can ensure a smooth and secure deployment of your application.
Overall, the combination of Nginx Plus Ingress Controller and OIDC provides a powerful toolset for securing your applications and delivering a seamless user experience.
To explore other approaches for securing applications in a Kubernetes cluster, you can check out our previous blog post on Authentication & Authorization in Kubernetes Cluster — adityaoo7.hashnode.dev/authentication-autho...
References
OpenID Connect Official Documentation - https://openid.net/connect/
Nginx Ingress Controller Official Documentation - https://docs.nginx.com/nginx-ingress-controller/intro/overview/
OIDC Policy Official Documentation - https://docs.nginx.com/nginx-ingress-controller/configuration/policy-resource/#oidc
OIDC policy example by Nginx - https://github.com/nginxinc/kubernetes-ingress/tree/v3.0.2/examples/custom-resources/oidc

