


"Authentication and authorization represent the new perimeter in a world where identity is the new control plane." - Satya Nadella, CEO of Microsoft.
Introduction
In our previous article, we explored how Oauth2 Proxy can be used as an external authentication proxy to secure applications within a Kubernetes cluster. While this is a good solution for simple use cases with a single IdP, Oauth2 Proxy comes with some limitations:
Oauth2 Proxy cannot integrate with SAML IdP, which is commonly used in enterprise systems for authentication and authorization.
In B2B enterprise systems, client organizations may want to use their own IdP for authentication without disrupting the host organization's IdP - multiple IdP integration - which Oauth2 Proxy cannot handle.
Oauth2 Proxy only supports a limited set of identity providers, such as OAuth2/OIDC providers.
This is where Dex IdP comes into play. In this article, We are going to see the integration of Dex IdP with Oauth2 Proxy.
Why Dex IdP?
Dex IdP is an open-source identity provider that can be used to federate authentication across multiple systems, making it an ideal choice for larger and more complex Kubernetes deployments. It allows you to integrate multiple identity providers, including OAuth2/OIDC providers, SAML, LDAP, and Active Directory, into one centralized system. Dex acts as a bridge between your applications and the identity providers, providing a seamless and secure authentication and authorization experience.
How does Dex IdP work?
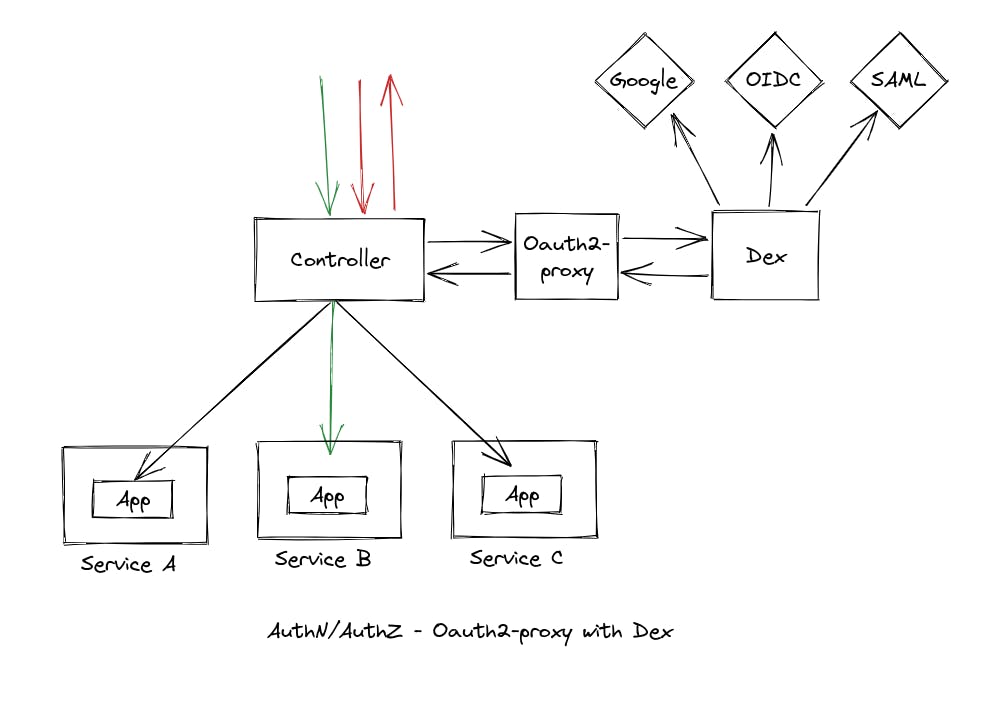
When a user tries to log in to a system that is protected by Dex IdP:
Dex provides the user with multiple Identity Provider (IdP) options from which they can choose to log in to their respective IdP.
The user selects the particular IdP in which their account is present, and Dex redirects the user to that IdP.
The user logs in to the IdP, and after successful authentication, the IdP redirects the user back to Dex.
Dex creates a session for the user and redirects the user to the particular application they were trying to access.
Installation and Configuration of Dex IdP
There are multiple ways to install Dex on a Kubernetes cluster, but in this article, we will be using Helm Charts.
To get started, add the Dex Helm Charts repository:
helm repo add dex https://charts.dexidp.io
In this example, we will integrate two IdPs: SAML IdP and OIDC IdP in Dex. To do this, create a new values.yaml file and paste the following example configuration into it:
# Configures the ingress for Dex
ingress:
  enabled: true
  className: nginx
  hosts:
    - host: "<your-domain>"
      paths:
        - path: /dex
          pathType: Prefix

# Configures the Dex instance
config:
  issuer: https://<your-domain>/dex
  storage:
    type: kubernetes
    config:
      inCluster: true
  web:
    http: 0.0.0.0:8080
  oauth2:
    responseTypes: ["code", "token", "id_token"]
  # Configures the connections for Dex
  connectors:
    - type: saml
      id: saml
      name: "Example SAML connection"
      config:
        entityIssuer: https://<your-domain>/dex/callback
        ssoURL: <saml-login-url>
        caData: <ca-certificate-in-base-64>
        redirectURI: https://<your-domain>/dex/callback
        # map your attributes here
        usernameAttr: username
        emailAttr: email
    - type: microsoft
      id: microsoft
      name: "Example Azure AD OIDC connection"
      config:
        clientID: "<client-id>"
        clientSecret: "<client-secret>"
        redirectURI: https://<your-domain>/dex/callback
        tenant: <tenant-id>

  # Configures the Client configuration
  staticClients:
    - id: <dex-client-id>
      secret: <dex-client-secret>
      name: "Oauth2 Proxy Static Client"
      redirectURIs:
        - https://<your-domain>/oauth2/callback
There are several important modifications to make:
host: Replace with your domain name.issuer: Replace with the issuer URL that will be used by your authentication method.
For SAML IdP:
entityIssuer: Set to the Issuer value you want to send during AuthnRequest.ssoURL: Set to the SAML login URL.caData: Set to the CA certificate in base64 format.redirectURI: Set to the redirect URI that your IdP will call after successful authentication.usernameAttrandemailAttr: check attributes configured for SAML IdP and map accordingly here (e.g. if the SAML IdP is configured to return the username attribute as "uid", then set usernameAttr: "uid" in the config, and if the email attribute is configured as "mail", then set emailAttr: "mail").
For Azure AD OIDC IdP:
clientID: Set to the Client ID provided by your IdP.clientSecret: Set to the Client Secret provided by your IdP.redirectURI: Set to the redirect URI that your IdP will call after successful authentication.tenant: Set to the Azure Tenant ID.
For Static Client (Oauth2 Proxy):
id: Set to the Client ID that will be used by the Oauth2 Proxy when connecting to Dex IdP.secret: Set to the Client Secret that will be used by the Oauth2 Proxy when connecting to Dex IdP.redirectURIs: Set to the callback URI of the Oauth2 Proxy.
To deploy Dex, run the following command:
helm upgrade --install -n dex dex dex/dex --values values.yaml
This command will install and configure Dex on your Kubernetes cluster. Dex will be hosted at "http://<your-domain>/dex".
For more information on configuring Dex to work with your specific identity provider, check out the official documentation at dexidp.io/docs/connectors.
Configuration of Oauth2 Proxy
To configure Oauth2 Proxy, you will follow similar steps as you did for configuring other IdPs inside Oauth2 Proxy. The difference will be that you will replace specific properties in the Deployment of Oauth2 Proxy with those that correspond to your Dex instance.
You will need to replace the following properties:
oidc-issuer-url: This is the issuer URL you specified in Dex.
OAUTH2_PROXY_CLIENT_ID: This is the static client ID you specified in Dex.
OAUTH2_PROXY_CLIENT_SECRET: This is the static client secret you specified in Dex.
Here's an example Deployment file for Oauth2 Proxy that shows how these values can be replaced:
apiVersion: apps/v1
kind: Deployment
metadata:
  labels:
    k8s-app: oauth2-proxy
  name: oauth2-proxy
  namespace: oauth2-proxy-ns
spec:
  replicas: 1
  selector:
    matchLabels:
      k8s-app: oauth2-proxy
  template:
    metadata:
      labels:
        k8s-app: oauth2-proxy
    spec:
      containers:
      - args:
        - --provider=oidc
        - --oidc-issuer-url=http://<your-domain>/dex
        - --scope=openid profile email
        - --email-domain=*
        - --upstream=static://200
        - --http-address=0.0.0.0:4180
        env:
        - name: OAUTH2_PROXY_CLIENT_ID
          value: <dex-client-id> # Replace with the client ID from Dex
        - name: OAUTH2_PROXY_CLIENT_SECRET
          value: <dex-client-secret> # Replace with the client secret from Dex
        - name: OAUTH2_PROXY_COOKIE_SECRET
          value: "bVbMfxlt8Wmq4E1OYTICqS_AZHTeVDUEdFP5LGbY05c"
        image: quay.io/oauth2-proxy/oauth2-proxy:latest
        imagePullPolicy: Always
        name: oauth2-proxy
        ports:
        - containerPort: 4180
          protocol: TCP
        resources:
          limits:
            cpu: 100m
            memory: 128Mi
          requests:
            cpu: 100m
            memory: 128Mi
After configuring and deploying Oauth2 Proxy with the values from your Dex instance, you will be able to use Dex as your identity provider.
Final Result
With Dex IdP and Oauth2 Proxy configured and deployed, you can now test the example by navigating to the domain specified in the manifest file for the host attribute. For example, if you set “example.com” as the host, visit example.com in your web browser.
After hitting the URL, you will be redirected to the Dex login page where you can choose an IdP to authenticate with from the options configured in Dex. The login page will look similar to this:

Select any one option to proceed with authentication. Once you have successfully logged in, you will be redirected back to the demo application, and you can begin to interact with it.
Congratulations, you have successfully integrated Dex IdP with Oauth2 Proxy! You can now use Dex to authenticate users to your web applications and APIs protected by Oauth2 Proxy.
Authorization using Dex IdP
In addition to authentication, Dex also supports authorization through the use of groups. When the groups claim is configured for an IdP, it is possible to require a user to be a member of a particular group to be successfully authenticated in Dex. Inside the connector configuration YAML file, we can pass groups to which access should be granted. Here is an example of how this can be done for a Microsoft OIDC connection:
...
  - type: microsoft
      id: microsoft
      name: "Example Azure AD OIDC connection"
      config:
        clientID: "<client-id>"
        clientSecret: "<client-secret>"
        redirectURI: https://<your-domain>/dex/callback
        tenant: <tenant-id>
        # Mention which groups are allowed access
        groups:
          - admin
          - developer
...
In this example, the groups property specifies that only users who are members of the admin or developer groups in the Azure AD instance will be allowed to access the protected resource. This way, you can perform authorization in Dex based on group membership.
Best Practices
Keep your certificates and secrets secure: Certificates and secrets play a crucial role in securing your authentication flow. Ensure that you store them in a secure location and rotate them frequently.
Use the latest versions: Always use the latest versions of Dex IdP and Oauth2 Proxy to take advantage of bug fixes and security patches.
Test thoroughly: Test your integration thoroughly before deploying it in production to ensure that everything is working as expected.
Use automation tools: Consider using automation tools to streamline the deployment and configuration of Dex IdP and Oauth2 Proxy, as it can save time and reduce the risk of manual errors.
Keep your configuration simple: Avoid overcomplicating your configuration. Keep your configuration simple and easy to maintain, and only include the necessary features.
By following these best practices, you can ensure that your Dex IdP and Oauth2 Proxy integration is secure, reliable, and easy to maintain.
Conclusion
In conclusion, integrating Dex and OAuth2 Proxy provides a secure and flexible solution for authenticating and authorizing users accessing your applications. Dex provides a centralized authentication service for your organization, while OAuth2 Proxy allows you to easily add authentication to your applications without needing to modify their code.
By following the steps outlined in this guide, you should now have a good understanding of how to integrate Dex and OAuth2 Proxy in your Kubernetes cluster. Remember to follow best practices when implementing this solution, such as regularly updating and securing your configurations, and testing thoroughly before deploying in production.
Overall, integrating Dex and OAuth2 Proxy can greatly enhance the security and usability of your applications, and enable your organization to better manage access control for your resources.
To explore other approaches for securing applications in a Kubernetes cluster, you can check out our previous blog post on Authentication & Authorization in Kubernetes Cluster — adityaoo7.hashnode.dev/authentication-autho...